• Skip to primary navigation
  • Skip to main content

LifeSkill Secrets

Joyfully Manage Your Life, Your Self and Your Stuff

  • About LifeSkill Secrets
  • Self Care
  • Care of Stuff
  • Life Management
  • Contact

Self Care

Self Care

Treat yourself with the love and care you would give the person you love most in life. Love your self. Care for your self.

Speak to your self with kindness. You know what I mean. Listen to the thoughts that are going through your head – hundreds per hour. Are they affirming, encouraging, supportive and loving? If not, it’s time to start speaking with kindness and respect to yourself.

You are taking the initiative to learn and do things someone else has done for you and you now are going to do for yourself – self care. Good for you! This takes practice so give yourself some grace.

Cherish Yourself

May 7, 2019 Leave a Comment
All content copyright LifeSkill Secrets

Cherish yourself -woman with hands on heart

For me, the idea of loving myself has always been difficult. The idea of loving myself seemed narcissistic, self-centered and self-absorbed but the more I avoided the idea of self love, the further I grew from the reality.

While talking with a friend recently I discovered I am not the only one who feels that way. Maybe our cultural ethic of putting others first has had its way with us.

The Great Commandment

Many Christians mistakenly think that self love goes against Christian values. On the contrary, self love is pivotal to the second part of the Great Commandment (below from Mark)

“Which commandment is the most important of all?” Jesus answered, “The most important is, ‘Hear, O Israel: The Lord our God, the Lord is one. And you shall love the Lord your God with all your heart and with all your soul and with all your mind and with all your strength.’ The second is this: ‘You shall love your neighbor as yourself.’ 


Matthew (Matt 22:37-39), Mark (Mark 12:30-31), and Luke (Luke 10:25-28)

However, the two lines Jesus spoke were originally from the Old Testament, the Torah (Deut 6:4-5 and Lev 19:17-18).

From a Biblical perspective, we are to love God first, and love our neighbors as ourselves, which means we first must love ourselves to have a guide as to how to treat our neighbors.

I still had trouble with the idea of self love even knowing that it was biblically alright to do so.

One day I was wishing that each of my three sons (my son by birth and two by other mothers who I also care deeply about) knew how much I cherish them. That’s when it occurred to me that cherishing someone is more tender, caring, intentional, deep and nurturing than just loving. At least as far as the way we use the words love and cherish now.

Cherish – the Word

Cherish means to protect and care for (someone) lovingly, to hold dear and to keep close in one’s mind. (https://www.google.com/search?rlz=1C1CHBH_enUS805US805&q=Dictionary#dobs=cherish)

I personally get a softer, closer, more intimate feeling when I think of cherishing. I also realized it’s the way I want to be treated and I think the way we all want to be treated. When we cherish someone, they have no doubt about how important they are to the joy in our world. They are treasured and valued. We wouldn’t hurt them, emotionally or physically. We would encourage and lift them up. We’d have their six at all times and not let others speak ill of them or do harm to them. That isn’t always the case these days where someone can say they love you, then betray you or hurt you. You would not do that to someone you cherish.

Cherishing Myself

So I thought about it and decided I could cherish myself. Of course, it would mean some changes would have to happen. I’d have to extend myself some grace. There could be no more shaming or name calling, only encouragement and rewards. I would need to pay attention to what (and who) was nurturing and what (and who) was not, and defiantly protect myself from people who do not bring joy into my life. Gentle introspection would help me find what filled me and what drained me and where my joy could run freely. I would need to build into my life time for soul enrichment and self care.

Funny thing I learned as I have started thinking in these terms. Once I started putting in the work of listening to my own small voice, I became more attuned to the small voices of others. Not the louder outer voices, but the child voices underneath. The fearful, raw, tender parts that need cherishing too. When I felt cherished and nurtured, I had it to give.

Cherish Yourself

So, here is my challenge for you. Are you ready to protect and care for yourself lovingly, to hold yourself dear and to keep yourself (and your best interest) close in your mind? Ready to extend yourself grace and encouragement? Will you treat yourself and your needs with respect and protect yourself from those who do not have your best interest at heart?

Go on, give it a try. Cherish yourself and let me know how it goes.

Filed Under: Life Management, Self Care

Basic Kitchen Knives

March 26, 2019 Leave a Comment
All content copyright LifeSkill Secrets

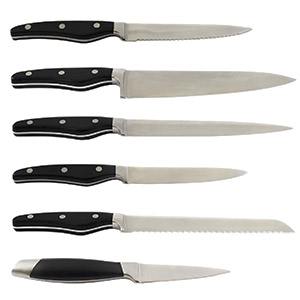
basic knives

One of the basics of any kitchen is a set of knives. They don’t all have to match, but its a good idea it they are good quality and sharp.

Once you invest in good knives, you can use them for the rest of your life. My favorite and most used knives are over 30 years old and I have a couple that are older still.

You can find a lot of sets of knives, but most include knives you may rarely use. There are only a few that you really need to have and will use all the time, so these are the basic knives.

Remember to get high quality knives and keep them sharp. A sharper knife is a safer knife because, if you get cut, a clean cut will heal faster. If the knife is sharp, there is also less likelihood you will get cut. A good test of a sharp knife is that it cuts through a tomato cleanly without pressing.

The Big 3

If you are just investing in good quality knives, consider starting with these three.

The Chef’s knife

chef's knife

The queen of kitchen knives is the chef’s knife. The Chefs knife is known for it long, wide, curved blade. This is the knife used to chop things up and cut bigger items, like melons. I use this knife every day. If you only have one really good knife, this is the one to have. They come in many different lengths of blade, so try them out to feel what’s comfortable for you.

The Paring Knife

paring knife

The paring knife is the smallest of your kitchen knives. It’s main purpose is to remove the peels from things like potatoes and so on, and also to cut small things. This is my second most used knife.

The Bread or Serrated Knife

large serrated or bread knife

This is called a bread knife because the serrated blade (the jagged, saw-like edge) is ideal for cutting through breads and cakes. In fact, serrated blade knives are the only ones of your kitchen knives to use on bread and pastries, or you will likely pull and tear them. Don’t use a sharpening tool on a serrated edge.

The Nice-to-Have Knives

The Carving Knife

carving knife

The carving knife has a long blade which is thinner and more straight than a chef’s knife. If you have a carving knife, it’s the one to use to carve a turkey, chicken, or roast because you can make a long drawing cut which will not tear the meat and makes more attractive servings.

The Smaller Serrated Knife

small serrated knife

Wielding a long serrated blade is not always needed for french bread, rolls, smaller cakes and so on, so its nice to have a smaller serrated knife to cut smaller baked items and for smaller hands (like children).

A Larger Paring Knife

large paring knife

While it’s not necessary to have 2 paring knives, I have found on more than one occasion its a good idea to have two, and one might be slightly larger than the other, though not necessarily.

Sharpening Your Kitchen Knives

Remember, practice good kitchen safety and keep your knives sharp.

You will need a tool to sharpen your non-serrated blades. I prefer a two sided sharpener to a sharpening rod. It’s just easier and quicker for me to use. Again, don’t use it on the serrated blades.

It you get in the habit of using sharp blades, you will not when they aren’t and it only takes a couple of minutes to get your kitchen knives sharp and working well again.

If you give a knife as a present (and several of mine were gifts because they are expensive), be sure to honor superstition or tradition and tape a penny to the blade so you don’t sever the friendship.

Do you have a favorite knife?

Filed Under: Kitchen, Self Care

Measuring Ingredients

March 5, 2019 Leave a Comment
All content copyright LifeSkill Secrets

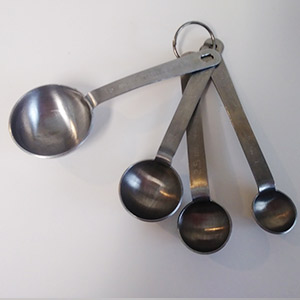
Measuring spoons for measuring ingredients wet and dry

The first thing that we do when cooking or baking with a recipe is measuring ingredients. For some of us its just “known” that there are different ways to do this depending on the type of ingredient we are using.

In much of the world, measuring of dry ingredients is done by weight, so instead of a cup of flour, they recipe would call for 128 grams. Really good cooks know that the amount of moisture in dry ingredients can make a difference in the outcome of their baking and want to account for that.

I have a recipe from my mother-in-law that calls for two cents yeast. It took me a while (and some trial and error) to finally work out that 2 cents was about a package of yeast in todays availability and for that recipe.

Understanding Measurements and Equivalencies

While cooking is usually more forgiving of measurements being off, baking is basically chemistry, and its important that proportions are correct. That is why its so important to get the measurements right.

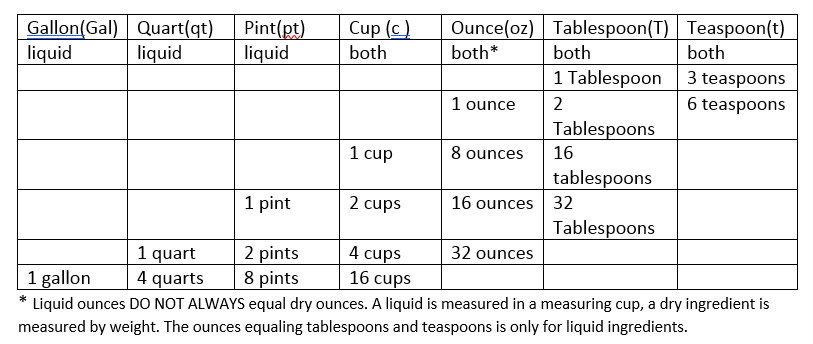
First, it helps to know and understand measurements. The table below will help. Items in the same row are equivalent.

Table of measuring equivalents

Wet ingredients include anything wet (duh) like water, milk, vanilla, soup stock, sometimes even eggs are measured this way. Recipes may call for one egg, or they occasionally may call for 4oz (ounces) of egg.

Dry ingredients would be things like flour, sugar, spices or shortening.

Items often measured by weight might be cheese, chocolate chips, nuts. A recipe may say to use one 12ounce bag of chocolate chips, or they may list 2 cups of chocolate chips.

Using the Right Tools to Measure Ingredients

Once upon a time, people actually used a coffee or tea cup to measure a cup and a normal kitchen teaspoon for a teaspoon. But that’s a lot of why there were good cooks and bad cooks. A cup could be 6-10 ounces and teaspoons and teaspoons and tablespoons also vary in capacity. So for cooking, its important to use measuring cups, spoons and a kitchen scale.

Measuring Spoons

Measuring spoons for measuring ingredients wet and dry

Measuring spoons work for both liquid and dry ingredients. For dry ingredients, the spoon is overfilled then leveled off with a knife or spatula so its even. For liquid ingredients, the extra runs off the spoon (don’t measure either dry or liquid over your mixing bowl or pan or you may get too much).

Now technically you could do the same thing (using a dry measure) with larger amounts, like cups, but you could also have a lot of run off.

But there are liquid measuring cups and dry measuring cups. What’s the difference?

Dry and Liquid Measuring Cups

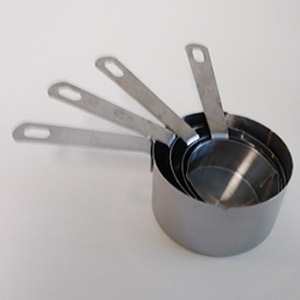
Dry measuring cups for measuring ingredients that are dry

Dry measuring cups need to be completely full then leveled off at the top with a knife or spatula to give you the correct measure.

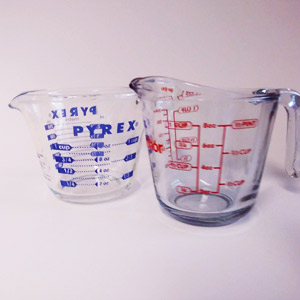
Liquid measuring cups for measuring ingredients that are wet

Liquid measuring cups allow you to see how much you have as you pour the liquid into the cup. If you pour too much you can see to pour it out or add more if needed. Sometimes recipes say things like “one egg and add enough water to equal one half cup”, and liquid measuring cups are perfect for that. Using liquid measuring cups for liquids saves on waste.

The Kitchen Scale for Measuring by Weight

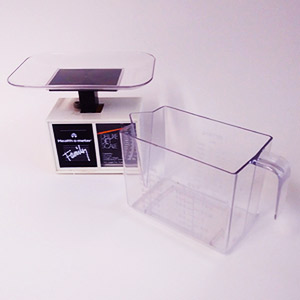
kitchen scall for measuring ingredients by weight

Sometimes recipes will ask for ingredients by weight, but the best reason for a kitchen scale is portion control on meats. In any case, the important thing is to know how to use it.

Often they have a plate on top. Mine also has a cup like holder. The cup like thing weighs more than the plate. Be sure that before you start adding ingredients that your pointer is at zero (that allows for the weight of the plate or container). They have an adjusting device that you move until the pointer is at zero ounces.

Then add your ingredients until the pointer is at the weight you want.

Knowing how and when to use which measuring device will make cooking (and especially baking) a lot easier.

Happy cooking!

Filed Under: Kitchen, Self Care

Corned Beef and Cabbage for Saint Patrick’s Day

March 2, 2019 Leave a Comment
All content copyright LifeSkill Secrets

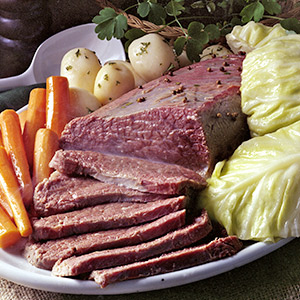
corned beef and cabbage

To me, corned beef and cabbage defines St Patrick’s Day. All my life it has been a staple food for March 17. I love it, and its easy to make.

Corned Beef is not the healthiest meat choice. It has lot of fat, sodium and cholesterol. Just keep this in consideration if on a restricted diet for those things.

Years ago, I had a boyfriend who actually brined the corned beef himself. The process of brining is really not very appetizing and takes about 10 days. o easy to just buy it all brined.

Buying the Corned Beef

Even living alone, I make it for myself in March and other times of the year. It’s usually on sale prior to the holiday. I buy two or three cuts and freeze them.

There are several brands and you will find some are just better (and usually more expensive), but even the more economical ones a good.

Corned beef is a beef brisket that has been brined (allowed to sit in a bath for many days). A whole brisket has two parts, the more expensive “flat” cut and the fattier, more economical  “point” cut.

Cooking Corned Beef and Cabbage

How easy is it to cook?

Take the (thawed if it had been frozen) piece of corned beef out of its wrapper (after noting how many pound it is) and place in a large dutch oven or pan

Cover with cold water. Add the contents of its seasoning packet if there is one.

Bring to a boil and reduce heat

Simmer (not boil!) for an hour per pound. Check from time to time to be sure its still simmering and has enough water to cover. Add more water if it needs it. Skim off any scum that may form on the top of the pan with a large (preferably slotted) spoon.

[Remember, simmering is like smiling, while boiling is laughing. It should just have small bubbles rising.]

Prepping Vegies

A half hour before the end of the cooking time, prepare any vegies you will add. Traditionally these include:

  • A head of cabbage – (size depends on how much you like cabbage, what ratio of meat to cabbage you are using and whether or not you are also doing carrots and/or potatoes. 
    Rinse the cabbage and cut out into 4 or 8 pieces. If it has a dense core, you may (or not) want to cut that out.
  • Small red potatoes – (These were always included until I cut back on carbs.). There are 2 ways to prepare these. Rinse well and either peel them entirely or peel a band around the center only (this keeps the peel from splitting which tastes fine but isn’t so pretty. I like the peel on the potatoes. It gives nice color and I like the flavor (plus I am lazy), but this is a personal preference.
  • Carrots can be regular carrots rinsed, peeled, tops trimmed off and cut into 1-3 inch chunks, or they can be baby carrots just rinsed.

After the beef has cooked long enough, remove the beef to a serving dish. Skim the water in the pan if necessary and add all the vegies to the pan with the water in it. Cook until done, about one half hour until they are as tender as you desire.

Note, you can add them with the meat still in the pan for the last ½ hour of cooking if you have enough room, but be careful that the hot water doesn’t flow over the sides of the pan.

Cooking Vegies Separately

Some people prefer their vegies cooked separate from the meat but they wont have as much of the briny flavor- or absorb fat and salt from it).

  • You can cook them in a separate pan with lots of water (or low sodium beef broth) on the stove until tender.
  • Another option is to nuke the vegies in a covered microwave safe dish with 2-4 Tablespoons of water until done.

That’s it. I often have a Killian’s Irish Red (my favorite beer) with my St Patrick’s Corned Beef and Cabbage to make it all complete!

Do you have any favorite St Patrick’s traditions or foods?

Filed Under: Recipes, Self Care

Oatmeal Breakfast For Healthful Good Eating

November 6, 2018 Leave a Comment
All content copyright LifeSkill Secrets

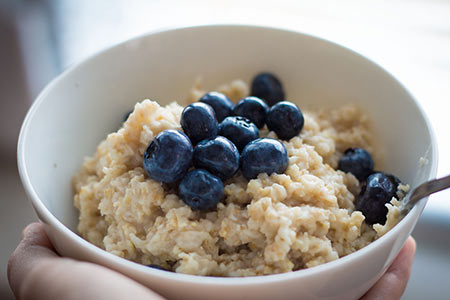
Oatmeal Breakfast with Blueberries

As LifeSkill Secrets has said before, breakfast is the most important meal of the day. I personally like 2 (water) basted eggs, but that doesn’t appeal to everyone, isn’t a good idea for those with cholesterol issues, and sometimes needs a change up. A hearty oatmeal breakfast is wonderful, especially for winter months.

Our variation is a solid meal, with blueberries for antioxidants, cinnamon for blood pressure, and walnuts to add protein.
Thought the way its written below is the most nutritious, you may not have the exact ingredients, time to cook slow oatmeal, or like different combinations.

See the LifeSkill Secret about why I use these ingredients, how to save time and money, and what you can change or substitute.

Oatmeal Breakfast Recipe

By the way, this is good for the occasional light dinner or lunch, too. This is for 2 servings, but you can double or triple, though the amount of milk may vary. Read the directions on the brand of oatmeal you bought,. I find they very wildly.

Ingredients

1/2 cup Whole Grain Steel Cut Oats- old fashioned slow cooking
(about 2 cups -go by the brand you bought) Low fat or Skim Milk
1/2 t cinnamon
1-2 T brown sugar
1/2 cup Blueberries
1/4 – 1/2 cup finely diced walnuts
1/4 – 1/2 cup Low fat or skim milk or yogurt for on top

Directions

  1. Follow the directions on the oatmeal box (using milk rather than water) to make the amount of oatmeal you want NOTE: Whole Grain Steel Cut Oats take 25-30 minutes to cook
  2. Just before it’s done cooking, add the cinnamon
  3. When done cooking, turn off and add the nuts and blueberries (even if frozen)
  4. Let sit a minute for the berries to warm up if frozen
  5. Spoon into bowls and top with brown sugar and milk or yogurt
  6. ENJOY!

LifeSkill Secrets:

Takes too long: you could cook in the evening and nuke in morning. I would never tell you to start it cooking then go shower because we know not to leave cooking unattended, right? Another trick is to make a big batch and eat over a few days.

Why Whole Grain Steel Cut Oats: Only Steel Cut Oats are minimally processed and whole grain. You get the most possible oat bran which is the most healthful part of the oat. Yes, you can substitute rolled oats, instant or regular, but the more processed, the less nutition. Since you are paying about the same, might as well make it good for you.

Low fat or Skim Milk: If used to make the oatmeal, it adds a good amount of protein to your oatmeal breakfast. In the post on basic nutriton, I talked about the importance of getting enough protein at every meal- especially breakfast. Using skim or low fat gets the most protein without added fat.

Cinnamon: Cinnamon is good for lowering blood sugar. Use as much as is tasty but don’t overdue it. I found I had a literal stomach pain if I ramped up the cinnamon too much.

Brown sugar: I love brown sugar and like a little sweetness, but this can be omitted, or replaced with a bit of honey or maple syrup- preferably not white sugar or corn syrup.

Blueberries: Blueberries are strong antioxidants and are very nutritious. In the winter or to cut down on cost, you can buy the large bag of frozen ones at Walmart. Then you don’t have to worry about washing them or spoilage, and it is less expensive and just as tasty.
Of course, you can add any other berry, or dates or raisins for a change if you have them, but blueberries are the most nutritious.

Finely diced walnuts: Nuts are a great source of protein and, though high in fat, its healthy fat. They also add a nice texture contrast to the oatmeal.

Milk or yogurt for on top: Again, this adds protein, while keeping fat content down. Some people prefer yogurt on their oatmeal, but be sure its unflavored and preferable Greek yogurt.

Filed Under: Recipes, Self Care

Buying Groceries

October 9, 2018 Leave a Comment
All content copyright LifeSkill Secrets

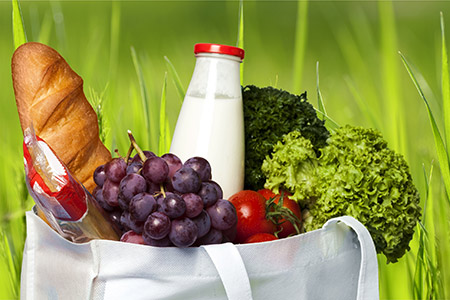
buying groceries- a bag of groceries

We all need to eat and there is a more healthful and less expensive option that going out to eat or ordering food in. Its called buying groceries, then preparing and eating them. Its so easy today, you can even do it online and have them delivered to your home if you want. For the sake of this post, I will address how to go about doing this the regular way of going to a grocery store to purchase groceries.

Planning to Buy Groceries

Plan what you want to buy

As in all things at My Own Maintenance, I suggest a little bit of planning. I have already written about the advantages of keeping a list, so this is where you start. Before you leave the house, spend a minute or two thinking if there was anything you forgot to put on the list.

  • Do you have enough of all the things you use regularly (this will be different for everyone, but might include eggs, milk, bread, meat, veggies, etc.)?
  • Is anything on sale that you use all the time and can stock up on (this is for people who read ads)?

Do you really need to make this trip? Most people don’t need to shop more than once a week, so keep that in mind when planning.

Be sure to take your reusable shopping bags. If you don’t have any, you can purchase them at most grocery stores.

Plan where you will shop

Hopefully most or all of the items on your list can be purchased at one store. If not, determine if you CAN get them all at the same place. Sometimes you can, but you would prefer to go to a second store because its slightly less money for some of the items. Will you actually be saving money if you have to drive extra and spend extra time to get those items (also think about the things you might buy that you don’t need while you are there)? If not, can those few items wait until you have more to purchase at the other store? It is a good practice from time to time to think about where you buy things and the time that it takes. If a store that is much closer has better quality but slightly higher prices, it might be the better option, especially if my shopping list is short.

Plan when you will shop

Try to avoid the busiest times and days at the store to save time and frustration. That includes any time on the weekend, especially Saturday morning, and after normal work hours.

If you find the store is always out of things you like, find out when they get deliveries and plan to get there later that day. I found my grocery store restocked on Tuesday, so Mondays they were often out of things I wanted since heaviest traffic was on the weekend. When I changed to shopping there on Wednesday, I didn’t run into the problem anymore.

Plan to do your shopping on the way to or from something else if possible. Can you pick up groceries after an evening out (when the stores are practically empty). Dont overthink this, but sometimes a little thought can save a lot of time and energy.

Be sure you will be home within 30 minutes of buying groceries that are frozen or refrigerated items. If its hot out, put those items in insulated bags and try to get home sooner.

Buying Groceries at the Store

There are books on buying groceries, but here are a few overall tips:

  • Don’t go grocery shopping when you are hungry. If you do, you will tend to buy too much and less nutritious food.
  • Shop the perimeter of the store as much as possible- that’s where the nutritious foods tend to be.
  • Use your shopping list and stick to it. If tempted to buy something not on the list, ask yourself if you really need it.
  • Many stores have comparison pricing (cost per ounce or cost per unit) on the shelf by the product. Use it to determine the best value.
  • Larger sizes are often a better value but not always. Check first using the comparison pricing and determine if you will use the larger size before it goes bad.
  • Check the ‘Best by’ and ‘Use by’ dates. Sometimes if close to that date, the store will reduce the price. This can be a great way to save money if you will actually use it right away. Some stores are not as careful about this and you could get bad food.  Also consider how long it will take you to use the item. If you are one person and plan to eat it over time, be sure the use by date is far enough away for you to do that.
  • Check produce for soft spots, brown areas(greens), mold.
  • Develop your senses and use them. If something looks, smells or feels ‘off’, give it a pass.
  • Don’t be afraid to ask questions. Butchers and produce grocers often are happy to share their knowledge with you. They will tell you how to know if fruit is ripe or how many people a pound of salmon will feed. Many stores even offer recipes.

Putting Groceries Away

Deal with the groceries in this order:

  1. Put anything in the freezer that needs to go there.
  2. Then, put anything in the fridge that needs to go there. Do not refrigerate: onions, tomatoes, peppers, eggplants, unripe fruits, uncut melons, potatoes, cucumbers (but not near the melons or fruit). If unsure, Google ‘refrigerate foodname’ .
  3. Fruits that need to ripen, like peaches or nectarines, close in a brown paper bag on the counter and check daily by applying gentle pressure with a thumb. Once they start to give, remove from the bag, put in a bowl in the fridge and use within a couple of days..
  4. Put away everything else.
  5. Go back to anything refrigerated that needs to be dealt with, like large packages of meat that need to be divided, wrapped and frozen, or vegies you may want to clean, cut and store (like celery sticks).

Buying groceries can be fun. If you don’t find it so, try buying yourself one treat as a reward or make it an adventure by getting something you have never tried before! Happy shopping.

Filed Under: Health, Kitchen, Self Care

Next Page »
DISCLAIMER
©2025 LifeSkill Secrets. All Rights Reserved.
Website Designed by Richterworks Web